Sunday, December 31, 2023

Public API Gateway Limitations for Intranet applications

 In the realm of secure intranet applications, protecting sensitive data while ensuring easy access for authorized users is paramount. Traditional setups often rely on public API gateways, which can expose internal services to unnecessary risks. Here, we explore an innovative approach: using OpenResty as an external load balancer within a DMZ, integrated with a custom authentication system (FAMS). This architecture not only enhances security but also offers greater control over internal traffic management.

Why Move Away from Public API Gateways?

Public API gateways are designed for wide accessibility, which can be a double-edged sword for intranet applications. They expose endpoints to the public internet, increasing the attack surface. Furthermore, their generic nature might not align well with specific internal security protocols.

The OpenResty Advantage in a DMZ

OpenResty, an enhanced version of the Nginx web server, offers a powerful platform for building a more controlled and secure network architecture. Deployed as an external load balancer in a DMZ, it acts as a gatekeeper, ensuring only authorized traffic reaches the internal network. This setup significantly reduces exposure to external threats.

Key Benefits:

  • Custom Traffic Management: Tailor traffic routing and load balancing to fit the unique needs of your intranet environment.
  • Enhanced Security: With OpenResty in the DMZ, exposure to external threats is minimized, as it handles all incoming traffic and requests.
  • Flexibility and Scalability: OpenResty's modular architecture allows for easy scalability and adaptability to changing security requirements.

Integrating FAMS for Authentication

FAMS, our custom authentication system, plays a critical role in this architecture. By integrating FAMS with OpenResty, we establish a robust authentication process for all incoming requests.

How it Works:

  • Authentication at the Entry Point: OpenResty intercepts all incoming requests. It then leverages FAMS to authenticate and authorize these requests before allowing access to internal services.
  • Seamless User Experience: Users interact with the intranet applications as usual, but with an added layer of security. The authentication process is transparent and efficient.

Overcoming Public API Gateway Limitations

This OpenResty and FAMS-based solution effectively addresses the limitations of public API gateways in several ways:

  • Reduced Public Exposure: By situating the load balancing and authentication mechanisms in a DMZ, the internal network remains isolated from direct public access.
  • Tailored Security: Unlike a one-size-fits-all public API gateway, this setup allows for customized security measures that align precisely with internal policies.
  • Control Over Traffic: Direct control over routing and load balancing ensures that only legitimate, authenticated requests are processed.

Conclusion

For organizations seeking to bolster the security of their intranet applications, transitioning from a public API gateway to an OpenResty and FAMS-based architecture offers a compelling solution. This approach not only enhances security but also provides greater control and flexibility, ensuring that internal applications remain both accessible and protected.

Saturday, November 4, 2023

Multi Level search in Microservice environment

 In a microservices architecture, data is typically distributed among different services, each with its own database. Implementing a multi-level search across these microservices can be challenging. The goal is to efficiently search and aggregate data from different microservices while ensuring optimal performance, scalability, and cost-effectiveness.

  • Solutions

Selective Replication pattern:

In this approach, we replicate the data needed from other microservices into the database of our microservice.

  • Selective Replication: Only replicate the data that is frequently accessed together. For example, if we often need to know the status of tasks associated with an instrument but not other details, only replicate the task status.
  • Event-Driven Updates: data will be kept in  sync using an event-driven approach. For example, when a task is created or updated, it could publish an event that the Instrument service listens to and then updates its own records accordingly.

Example

Tasks Table: In the Instrument module, We could have a table that stores task details associated with an instrument. This could include the task ID, status, type, etc.

Pros
  • Optimized Performance: By replicating frequently used data, we reduce latency and improve user experience.
  • Reduced Network Calls: This approach minimizes the number of cross-service calls for common operations.
  • Flexibility: We have the flexibility to fetch detailed data when necessary.
Cons
  • Cross Service Calls The idea is to replicate only the most frequently accessed and critical attributes to optimize performance and reduce cross-service calls. However, for attributes that are less frequently used or for details that require a more comprehensive view, we might still need to make calls across microservices.
API Composition Pattern
In this approach, ApiGateway(or a composite microservice) aggregates data from multiple services and returns a unified response. This pattern is useful when we want to fetch data from different microservices in a single API call without the need for data replication. For Example -  Details of an instrument along with the tasks associated with that instrument


Flow
  • The client requests details about an instrument, including its associated tasks.
  • The request is received by the API Gateway or a Composite Microservice, which acts as an orchestrator.
  • The API Gateway first calls the Instrument Management microservice to fetch details about the requested instrument.
  • After obtaining the instrument details, the API Gateway calls the Task microservice to fetch tasks associated with the instrument.
  • The API Gateway aggregates the instrument details and the associated tasks into a unified response.
  • The aggregated response is sent back to the client.
Pros
  • Single API Call: The client can fetch data from multiple microservices with a single API call, simplifying client-side logic
  • Flexibility: The API Gateway can tailor responses to the specific needs of different clients.
  • Decoupling: Microservices remain independent and can evolve without affecting the client-side code.
Cons
  • Memory: It might not be suitable for complex queries and large datasets that require in-memory joins. 
  • Complexity: The API Gateway may need to implement complex orchestration and error-handling logic.
  • Dependency: If one microservice is down, it could potentially affect the entire operation.
  • Error Propagation: Errors from one microservice need to be gracefully handled and communicated to the client.
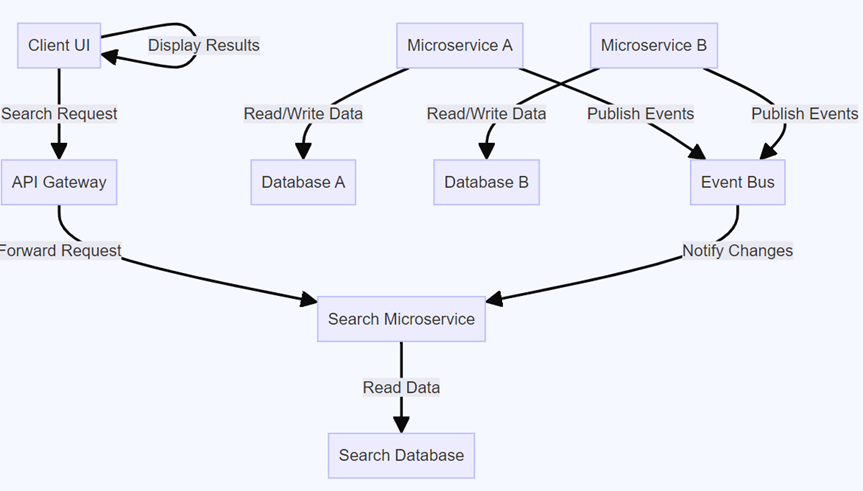
Search Microservice
The Search Database typically contains a subset of the data from the other microservices, optimized for search operations. It may not have all the data but instead holds indexed, denormalized, or transformed data that is required to fulfill search requests quickly and efficiently.
  • The microservices publishes events (SNS/SQS) when data changes.
  • The Search Microservice subscribes to these events and updates its data in real-time or near-real-time.
  • The Search Microservice processes and indexes the fetched data in a database


Flow
  • A client (e.g., a web application) initiates a search request with specific criteria.
  • The request may first go through an API Gateway, which routes the request to the appropriate microservice.
  • The Search Microservice processes the search criteria and queries the indexed data.
  • If necessary, the Search Microservice aggregates or transforms the data to match the desired response format.
  • The Search Microservice sends the search results back to the client.
  • The client displays the search results to the user.
Database Aggregator
A central database is used to aggregate and store data from different microservices, providing a unified point for querying and retrieving data.
Each microservice owns its data and performs its business operations as usual. Data from these microservices is then aggregated into a central database.
Event-Driven Updates:
  • Microservices can publish events when data changes (Create, Update, Delete operations).
  • The central database subscribes to these events and updates its records accordingly.
Search and Query:
  • When a multi-level search request is made, the system queries the central database, which contains aggregated data from all microservices.
  • The central database can be optimized for search operations, facilitating complex and cross-cutting queries.
  • Query: The central database can also be  queried directly to fetch and search data.

  • Pros
    • Simplified Queries
    • Performance
    • Loose Coupling
  • Cons
    • Complexity
    • Data Consistency:
    • Storage Overhead

Tuesday, September 12, 2023

ARM Servers in AWS: Cost-Effective Cloud Computing

In the vast landscape of cloud computing, a new contender has emerged, promising efficiency and cost-effectiveness: ARM servers. As AWS embraces this technology with its Graviton processors, it's essential for businesses and developers to understand its potential advantages and limitations.


The Rise of ARM Servers

Traditionally, servers have predominantly used x86 processors. However, ARM, known for its dominance in the mobile device sector, is making inroads into the server world. The primary allure? Power efficiency. ARM processors, being based on the RISC (Reduced Instruction Set Computing) architecture, inherently consume less power, leading to notable operational savings.

Cost Benefits of ARM in AWS

Several factors contribute to the cost-effectiveness of ARM servers:

Simplified Architecture: ARM's RISC foundation means it can execute a reduced set of instructions more rapidly, often leading to cost and performance benefits.

Power Consumption: The reduced power needs of ARM processors translate to lower cooling and operational costs in server environments.

Advanced Manufacturing: ARM chips can benefit from state-of-the-art manufacturing processes. Although it's worth noting that both ARM and x86 benefit from modern manufacturing techniques, ARM's design can sometimes lead to additional savings.

Optimized Server Density: The compact nature of ARM-based servers allows for more dense configurations in data centers.

AWS's Embrace of ARM

Amazon Web Services (AWS) has been at the forefront of the ARM server movement with its bespoke Graviton processors:

Graviton2 Instances: Offering up to 40% better price-performance metrics compared to their x86 counterparts, these instances are based on the Arm Neoverse N1 core.

A1 Instances: Ideal for general-purpose tasks, these instances use the AWS Graviton processor, which is anchored on the Arm Cortex-A72 core.

Ideal Applications for ARM Servers

Certain workloads are particularly well-suited for ARM servers:

  • Machine Learning & Artificial Intelligence
  • Content Delivery Networks (CDNs)
  • Web Servers
  • Databases
  • High-Performance Computing (HPC)
  • Containerized Applications

Potential Limitations

While ARM servers have numerous advantages, they aren't a one-size-fits-all solution:

  1. Instruction Set Dependencies: Workloads dependent on specific instruction sets, like Intel's AVX-512, may not be optimized for ARM.
  2. Memory Demands: For memory-intensive tasks, selecting the right ARM instance type is crucial.
  3. Operating System Compatibility: Major operating systems like Ubuntu and Amazon Linux 2 are ARM-friendly, but not every OS version might be.

Selecting the Right ARM-based AWS Instance

For those considering a switch or trial of ARM-based servers in AWS, understanding the available instance types is crucial. Here are two prominent ARM-based EC2 instance types:

  1. T4g Instances:

Use Case: These are part of the AWS burstable general-purpose instance family. They are well-suited for workloads with moderate CPU usage that occasionally need to burst.

Features: T4g instances provide a baseline level of CPU performance with the ability to burst CPU usage to a higher level using CPU credits. They offer a balanced mix of compute, memory, and network resources.

Processor: Powered by the AWS Graviton2 processor, T4g instances can deliver up to 40% better price-performance over comparable x86-based T3 instances.

    2. M6g Instances:

Use Case: These are designed for general-purpose workloads, such as application servers, mid-size data stores, microservices, and cluster computing.

Features: M6g instances offer a balance of compute, memory, and networking resources. They are ideal for workloads that need consistent performance and can take advantage of improved price-performance.

Processor: Like the T4g, M6g instances are also powered by the AWS Graviton2 processor, delivering significant performance improvements over the previous generation M5 instances.

For users looking to optimize their cloud expenditure and enhance performance, both T4g and M6g instances provide compelling options. However, it's essential to benchmark these instances with your specific workloads to determine the best fit.

Review more details here.

Compute – Amazon EC2 Instance Types – AWS


Thursday, September 7, 2023

Two-Tier Authentication in Microservices Architecture


Microservices are decoupled, self-contained units, which makes security pivotal. Two-tier authentication can offer an extra layer of protection. By integrating both AWS Cognito (for cloud-based authentication) and FAMS (an on-premises solution), we can create a robust authentication mechanism for such architectures.

It's a clear separation of concerns, with FAMS focusing on user identity and Cognito securing your API. This is a valid and robust approach, particularly if you want to leverage Cognito's capabilities for managing API access without intertwining it with FAMS.

Two-Tier Authentication in Microservices

Microservices often communicate through APIs. The two tiers in this setup are:

On-Premises Authentication (e.g., FAMS): Before accessing cloud-based microservices, authentication through on-prem systems like FAMS ensures that the initial user or service is validated.

Cloud-Based Authentication (e.g., AWS Cognito): After the initial validation, Cognito facilitates the subsequent authentication steps, providing tokens that are required to access microservices' endpoints.

Benefits of Using AWS Cognito with FAMS

·        Seamless Integration: AWS Cognito integrates well with AWS services and can work in tandem with FAMS for initial authentication.

·        Token-based security: After initial authentication with FAMS, Cognito handles token-based authentication for cloud resources.

·        Flexibility: Offers the ability to switch between different authentication providers.

Sequence Flow in a Microservices Environment


Conclusion

Two-tier authentication using both FAMS and AWS Cognito offers a comprehensive authentication strategy for microservices, bridging on-premises systems and cloud architectures. It ensures that microservices are only accessed by authenticated clients and services, upholding the principles of security and integrity.

Sunday, August 6, 2023

SQL Server Editions: Balancing Availability, Downtime, and Cost

Choosing between SQL Server editions requires a careful balance of high availability benefits against cost implications. For applications that rely on multiple databases, this decision is paramount.

Availability and Downtime:

  • SQL Server Enterprise Edition: This edition supports Always On Availability Groups, allowing multiple databases to be included in a single group. In the event of a database failure, all databases in the group failover together, ensuring application consistency. This feature is pivotal for applications that depend on multiple databases.

  • SQL Server Standard Edition: The Standard edition only supports Basic Availability Groups, limiting it to a single database per group. This means if one database fails, it doesn't guarantee the failover of other related databases, potentially causing inconsistencies in applications relying on multiple databases.

For applications requiring multiple databases to failover together for consistent performance, the Enterprise edition emerges as the preferred choice.

Cost Comparison:

  • SQL Server Enterprise Edition: At 4vCPU and 16GB RAM, the cost is higher but offers advanced features.

  • SQL Server Standard Edition: The same configuration is more budget-friendly but might lack some advanced features.

While the Enterprise edition offers advanced features, it comes at a higher cost. If budget constraints are significant and the application can tolerate some downtime, the Standard edition, combined with workarounds like Log Shipping, becomes a viable option.

Log Shipping:

  • This method involves periodic backups of the transaction log from the primary database, which are then restored on a secondary database.

  • If the primary database fails, the secondary database must be manually activated, which can be time-consuming, especially for large databases.

Variables to Consider in Decision-Making:

  1. Number of Databases: For applications that rely on multiple databases, the Enterprise edition is more suitable.

  2. Availability Requirements: If high availability is paramount, the Enterprise edition is the recommended choice.

  3. Future Scaling: Anticipating growth in user base or data volume? The Enterprise edition, with its advanced features, is a better long-term investment.

  4. Cost: While the Standard edition is more budget-friendly, it might require workarounds that could impact RTO.

Conclusion:

For applications that rely on multiple databases and require high availability, the SQL Server Enterprise edition is a clear frontrunner. However, it's essential to balance this need against cost constraints and evaluate the potential implications of workarounds in the Standard edition. Making an informed decision now can save time, and money, and ensure consistent application performance in the long run.

Friday, April 28, 2023

AWS Secret Manager for application running on Amazon EC2 instances

Using AWS Secret Manager


Introduction

This technical document describes the approach of using AWS Secrets Manager to securely manage secrets and credentials for application running on Amazon EC2 instances. The document outlines the steps to configure the necessary infrastructure components, including AWS Secrets Manager, AWS Identity and Access Management (IAM), and Azure DevOps.

Solution defined in the document is generic and can be applied to programs planning to implement AWS secret manager in their respective projects leveraging Azure Devops

Approach

The approach described in this document consists of the following steps:

·        Configure AWS Secrets Manager to store secrets

·        Create an IAM policy for the EC2 instance to access Secrets Manager

·        Configure Azure DevOps to fetch secrets from Secrets Manager

·        Pass secrets to the .NET Core application using environment variables or application config


Detailed Solution

1.      Configure AWS Secrets Manager to store secrets

·        Create a new secret in AWS Secrets Manager for each environment (dev, qa, prod) that the application uses

o   Non Prod

§  Dev_Secrets

§  QA_secrets

§  Qualif_Secrets

o   Prod Secrets

§  Prod_Secrets

·        Alternately we can also store all environment secrets per service.

Note - If you have a small number of services and environments, storing all environment secrets per service may simplify secret management and reduce the risk of misconfigurations. However, if you have a large number of services and environments or require more flexibility, storing secrets per environment may be a better approach.

If you are expecting to develop multiple micro services hence it’s better to go for storing secrets per environment


·        Store all the secrets for each environment as a key-value pairs in JSON format


2.      Create an IAM policy for the EC2 instance to access Secrets Manager

·        Create IAM Users for prod and non-prod environments

o   Generate AWS access key and secret access key

o   Access Type – Programmatic Access

·        Attach Policy SecretsManagerRead to Users created in step 2

·        If we push the secret to App.config then this is not required

o   Attach IAM roles for EC2 instances for applications to access Secret manager at runtime

o   Attach the appropriate AWS managed policy that grants permissions to access Secrets Manager


3.      Configure Azure DevOps to fetch secrets from Secrets Manager

·        Create a new service connection in Azure DevOps for AWS, using the IAM credentials for accessing Secrets Manager

o   Navigate to the "Project Settings" in Azure DevOps and click on "Service connections".

o   Click on "New service connection" and select "AWS".

o   Follow the prompts to enter your AWS access key and secret access key, as well as the region where your AWS resources are located.

4.      Create a new pipeline variable in Azure DevOps for the secret name:

o   In the Azure DevOps pipeline, define variable (e.g., "EnvironmentSecret") and set the value to the name of the secret that you want to fetch from AWS Secrets Manager.

§  E.g: EnvironmentSecret = Dev_Secrets’ – to Identify Build environment

§  Refer secret name created in Step 1


5.      Add an Azure DevOps task to fetch the secret:


o   In Azure DevOps pipeline, add a task that fetches the secret from AWS Secrets Manager.

o   aws secretsmanager get-secret-value --secret-id $(EnvironmentSecret) --query SecretString --output text

o   aws secretsmanager get-secret-value --secret-id EnvironmentSecret --query SecretString


6.      Pass the secret value to your .NET Core application

There are multiple options to store the secret . This can be evaluated and agreed upon


o   Use Environment Variable in EC2

§  Via Azure DevOps task and update environment variable in EC2

§  MySecretName ={ SecretString }


(OR)

o   Use configuration files

§  Via Azure App Service Deploy task to deploy the configuration file to the Azure App Service that hosts your .NET Core application


o   Store the Output secret value from the previous step into a Key value pair

o   Create new Azure DevOps task called "Azure App Service Settings"

(OR)

o   Store the secrets in Secure Files in Azure Pipelines and push it into appconfig file

Go to Pipelines > Library > Secure files


7.      Aplication code

.NET Core application to retrieve the value of "MySecretName":


string secretValue = Environment.GetEnvironmentVariable("MySecretName");


References

https://learn.microsoft.com/en-us/azure/devops/pipelines/process/variables?view=azure-devops&tabs=yaml%2Cbatch

https://learn.microsoft.com/en-us/azure/devops/pipelines/tasks/reference/azure-app-service-settings-v1?view=azure-pipelines&viewFallbackFrom=azure-devops

https://aws.amazon.com/blogs/modernizing-with-aws/how-to-load-net-configuration-from-aws-secrets-manager/


Barcode Printing with AWS AppStream

Amazon AppStream 2.0 supports local printer redirection, enabling users to print documents, including barcodes, from their streaming applica...